Guide: Replacing a 2009 - 2014 Ford F150 Wheel Bearing & Hub
Summary:
- Wheel bearings help your F150 handle and brake properly by making sure the wheels always turn at the same rate as one another.
- You’ll need a jack and stands, a lug wrench or impact wrench, a torque wrench, a socket set, and a replacement wheel bearing and hub assembly for this job. You should also have a hanger or wire, pry bar, hammer, fine grain sandpaper, cloth, pliers, and anti-seize lubricant for best results.
- The steps you’ll need to follow, in order, are: jacking up your truck and removing the wheel, removing the brakes, removing the hub assembly, installing the new bearing, putting the hub assembly back on, reinstalling the brakes, replacing the wheel and lowering the truck back down. Read on for details on each step and find a video walkthrough.
The Ford F150 is one of the most popular pickup trucks of all time—and with good reason. This tough, reliable truck offers plenty of towing power along with comfort and style for your daily drives. You’ll just have to make sure you replace wear and tear components like wheel bearings on a regular basis to keep your F150 ruling the road.

Replacing Your 2009 - 2014 Ford F150 Wheel Bearing & Hub? This is the part you need!
View productImage does not represent actual product
We’re here to help. Use our online tool to buy high-quality F150 wheel bearings here, then read on for a step-by-step guide on how to install them in your pickup. With our guaranteed fit and precision machining process, you’ll find it easy to put in the best bearings your truck has ever had.
Why Does Replacing Your Wheel Bearings Matter?
Replacing the wheel bearings in your Ford F150 helps keep your driving experience safe and comfortable for as long as your truck lasts. Wheel bearings help your wheels turn smoothly during everyday maneuvers like accelerating, cornering, and braking.
However, wheel bearings wear out over time and need to be replaced every 85,000 to 100,000 miles. When they wear out, the wheels on your car may no longer turn at the same rate, making your car harder to steer properly and impacting your ability to brake effectively. To maintain proper control and reduce the risk of an accident while driving, always replace your wheel bearings on time with high-quality aftermarket components.
What You’ll Need Before You Begin
Here’s what you’ll need to replace the wheel bearing and hub on your 2011-2014 Ford F150 by yourself:
- A new wheel bearing and hub assembly for your truck
- 2009 - 2010 Ford F150 wheel bearing & hub assembly
- 2011 - 2014 Ford F150 wheel bearing & hub assembly
- A jack and jack stands
- Lug wrench or impact wrench
- Socket set and ratchet
- Torque wrench
- Brake caliper hanger or wire
- Pry bar
- Hammer
- Fine grain sandpaper
- A cloth
- Pliers
- Anti-seize lubricant to apply to the hub assembly bolts or nuts.
 Via GoTech on YouTube.
Step 1: Jack Up Your Truck & Remove the Wheel
Before doing anything else, loosen each of the lug nuts on your truck’s wheel by just a little—less than ¾ of a turn. This will ensure that your wheel doesn’t spin when trying to get the lug nuts off later.
Next, use your jack to raise the truck safely off the ground, and use jack stands to support it. Then take the lug nuts off all the way and remove the tire. If you’re having trouble, wrap your hammer in a cloth and tap the tire gently from behind to loosen it.
From here, you should be able to remove the dust cap over your axle with a pair of pliers. Be gentle so you don’t damage it. Then, use a 15mm socket to remove the axle nut underneath the dust cap.
 Via GoTech on YouTube.
Step 2: Remove the Brakes
Now it’s time to remove the caliper. Use a 21mm socket to remove the mounting bolts holding the caliper bracket in place, then slide it up and off the rotor. Use your hangar or wire to keep the caliper out of the way until it’s time to go back on.
The rotor should come off fairly easily once the caliper is gone—but just like before, you might need to tap it from behind with a hammer wrapped in cloth to loosen it up. Be gentle if you want to keep using these rotors so they don’t get damaged.
 Via GoTech on YouTube.
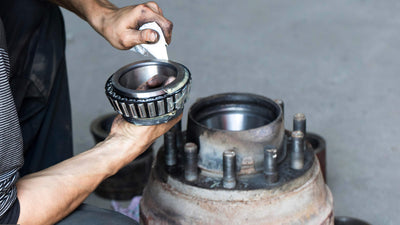
Step 3: Remove the Hub Assembly
Now you can unbolt the hub assembly itself. Use an 18mm socket to remove the four bolts on the rear of the hub assembly, which connect it to the wheel knuckle.
Before you can take the hub assembly off, you’ll need to attach the ABS brake line. You’ll need an 8mm socket to get the bolt attaching the ABS harness to the knuckle off (be careful, since this bolt is small and can break easily). Then pop the clips off and remove the connector from underneath the fender liner. Once you press in the red tab locking it in place, it should be easy to unplug by hand.
Use your hammer to tap out the old hub assembly and bearing from the rear. Then use a soft cloth to protect the spline while removing as much rust from the installation area as possible with fine grain sandpaper. Congratulations! You’re halfway there.
 Via GoTech on YouTube.
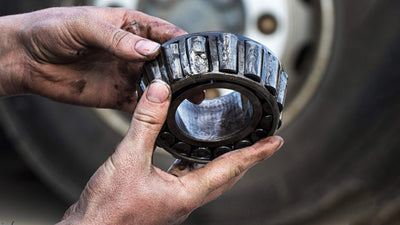
Step 4: Install the New Bearing & Hub Assembly
Apply some of your lubricant to the area before installing the new bearing. Make sure to grease the splines to prevent friction during future use.
Pull the axle shaft all the way in and make sure the ABS harness is bolted in at the top—then slide the new hub in over the axle shaft end.
When the hub and axle shaft are properly lined up and meshed together, start the bolts that connect the new hub assembly to the wheel knuckle. Snug each one in first to get the assembly in straight, then torque them to 129 lb-ft each.
 Via GoTech on YouTube.
Step 5: Reinstall the ABS Harness
Check the axle to make sure it is protruding far enough through the new hub assembly, then torque the axle nut back on to 30 lb-ft. Reapply the dust cap afterward.
Reinstall the ABS harness, making sure it clicks into position with the body-side connector underneath the fender liner and locking it in place with the tab.
Use a single lug nut to hold the new hub assembly and bearing in place while you’re putting the brakes back on.
 Via GoTech on YouTube.
Step 6: Put the Brakes Back On
Slide the brake rotor on and then reposition the caliper over it. Torque the bolts for the caliper bracket to 184 lb-ft each. We’re almost done!
Step 7: Put the Wheel Back On
Now it’s time to put your wheel back on. The torque specs you’ll want to use here depend on the specific rims you’re using—check your owner’s manual for the exact number if you have stock rims, or the product information for any aftermarket rims you might be using. Always torque the lug nuts for your wheel in a criss-cross pattern to ensure that they go on evenly, then lower the truck back down to the ground. Nice work—you did it!
Video Walkthrough
Want to see the steps above in action? Check out this video we found that shows you the whole process for replacing the wheel bearing and hub assembly on a 2011-2014 Ford F150:
Drive Your F150 with More Comfort & Confidence
With our reliable aftermarket parts and detailed walkthrough above, you should be fully equipped to replace the wheel bearing in your 2011-2014 Ford F150 properly. To have specific questions about performing this task on your vehicle answered or find out more about any of our products, get in touch with us and speak with a member of our team who can provide more details.
Share this
Explore more
Continue Reading